

Here we go! Part 1 of my tutorial for the dress variation that I created for The BurdaStyle Sewing Handbook! So let's dive right in and work on altering the pattern.
To follow this tutorial you will need the dress pattern from the book, some pattern paper, a pencil or pen, tape, and a straight edge.
To follow this tutorial you will need the dress pattern from the book, some pattern paper, a pencil or pen, tape, and a straight edge.

Trace pattern pieces 1, 2, 3, 4, 6, and 7 in your size onto pattern paper (or cut out a printed version of the dress pattern as I have done). Once that's done, we will make the alterations, plus create a new pattern piece 10 for the collar.
Center Front (pattern piece 1):
 1) Trace pattern piece 1 onto pattern paper.
2) Draw a new center front line that is parallel to and 1 inch away from the original center front fold line. This dress variation buttons in the front, so this step creates the button placket.
 3) Draw points A and B as shown in the photo.

4) Draw a line that goes through point A and that is 1 inch away from point B.

5) Soften the top of the line drawn in step 4, and soften the curve where the two new lines meet.

6) Add seam allowance on all edges and cut out your new pattern piece.
Side Front (pattern piece 2):

Pattern piece 2 has no alterations. Add seam allowance to all edges and cut out pattern piece.
Back Yoke (pattern piece 3):

Add seam allowance to edges, except on center back zipper line. The back zipper is omitted in this variation, so the back yoke pattern piece will be cut on the fold. Cut out new pattern piece.
Back (pattern piece 4):

Add seam allowance to edges, except on center back zipper line. The back zipper is omitted in this variation, so the back pattern piece will be cut on the fold. Cut out new pattern piece.
Front Skirt Panel (pattern piece 6):


1) Cut pattern piece 6 into thirds vertically from the waist to the hem.

2) Tape the three pieces onto pattern paper, but space them 2 inches apart from each other. This adds in the fabric needed for the pleats in this dress variation.

3) Add seam allowance to side and top, and add desired seam allowance to the hemline. Cut out new pattern piece.
Back Skirt Panel (pattern piece 7):

Follow the same steps that were used to alter the front skirt panel.

Since the back center zipper is omitted in this variation, pattern piece 7 will be cut on the fold. Leave off seam allowance along the center back seam. Add seam allowance to side and top, and add desired seam allowance to the hemline. Cut out new pattern piece.
Collar (new pattern piece 10):

1) To make the collar pattern piece, you will need the back yoke pattern piece 3 and the center front pattern piece 1. Fold the seam allowance along the shoulder of both pieces.

2) Temporarily tape pattern pieces 1 and 3 together at the shoulder as shown.

3) Trace the neckline created by these two pieces onto pattern paper.
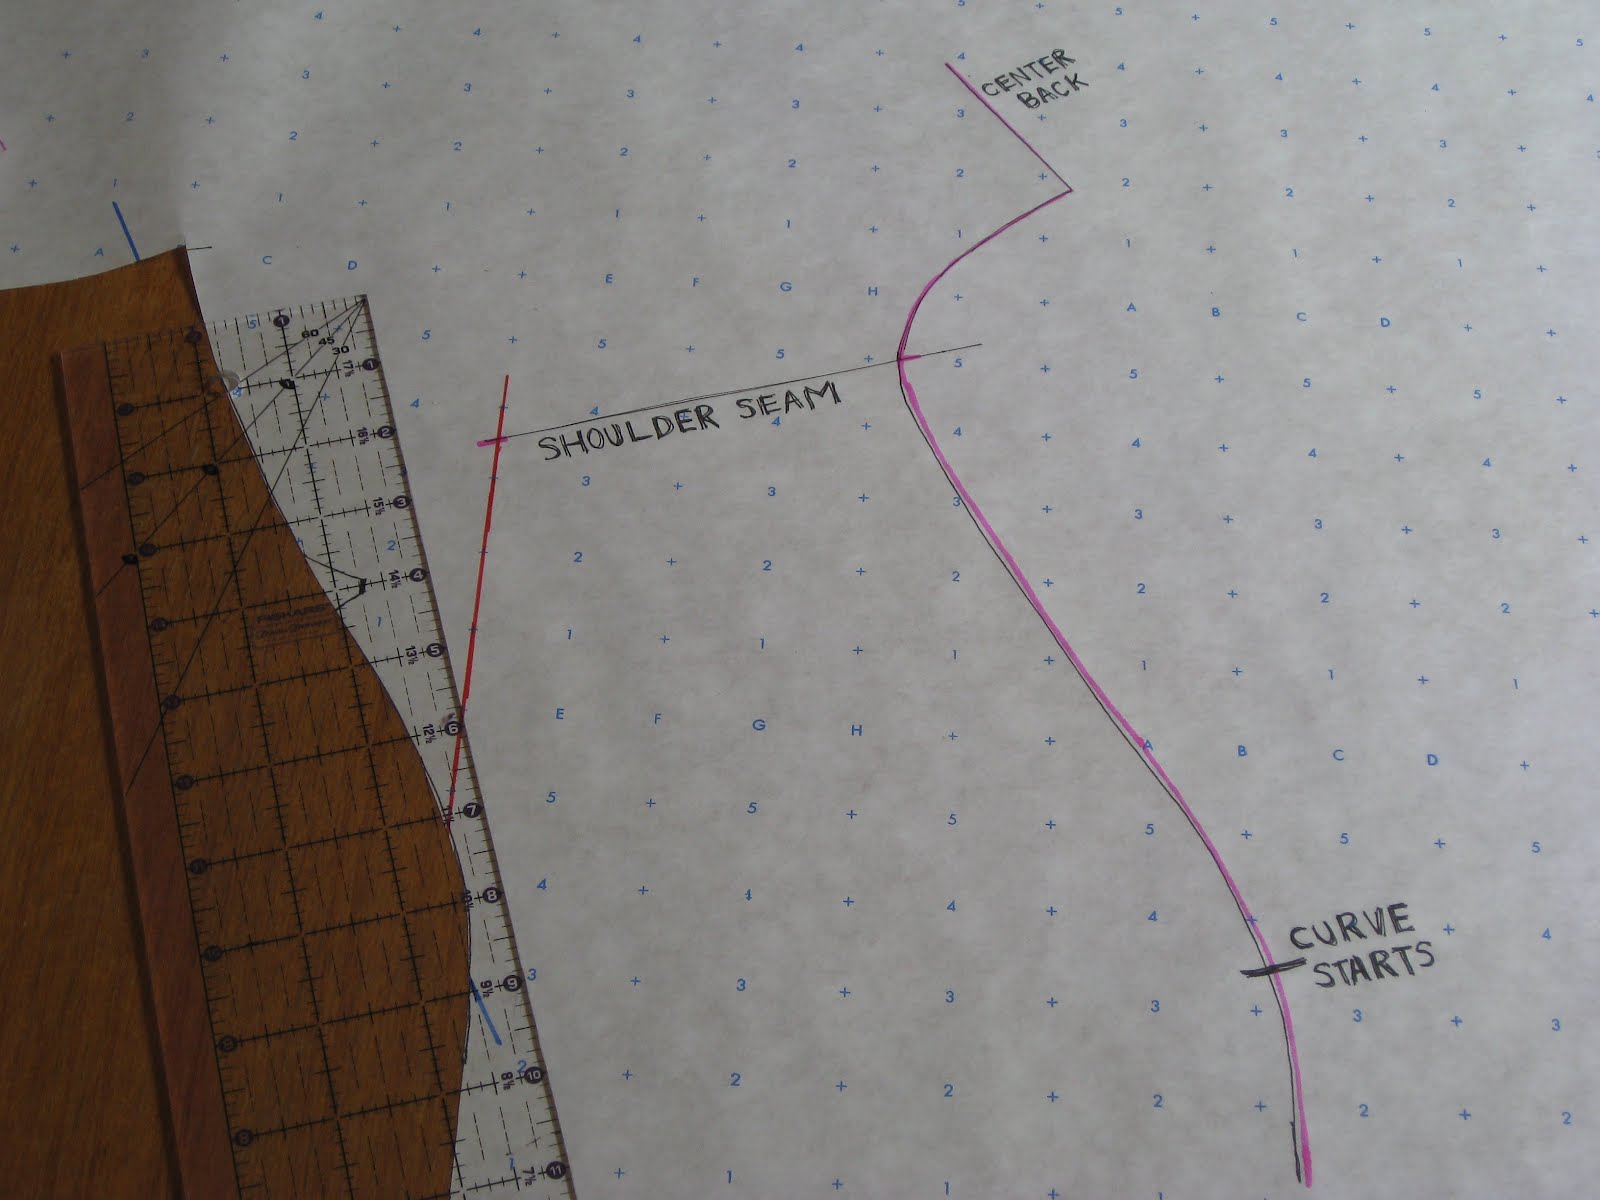
4) When tracing the neckline, make sure to mark the center back, the shoulder seam, and the area on pattern piece 1 where it starts to curve downward.

5) Draw seam allowance in from the neckline you have just traced since seam allowance is already included on pattern pieces 1 and 3.
Along the center back, draw a mark 1 inch in.
Along the shoulder seam line, draw a mark 2 inches in.
About halfway between the shoulder seam and where the curve starts, draw a mark 2 inches in.
Along the center back, draw a mark 1 inch in.
Along the shoulder seam line, draw a mark 2 inches in.
About halfway between the shoulder seam and where the curve starts, draw a mark 2 inches in.

6) Draw in the curve of your collar, starting at your mark on the center back, going through the other marks you made in step 5, and ending where you marked the start of the curve.

7) Add seam allowance to the outer curve and cut out the new collar pattern piece.

And there you have it!
Please let me know if you have any questions about the steps taken to alter the pattern pieces.
The next parts of this tutorial will be all about cutting and sewing.
Please let me know if you have any questions about the steps taken to alter the pattern pieces.
The next parts of this tutorial will be all about cutting and sewing.
Yay! I'm so excited! Thanks for sharing!
ReplyDeleteThank you so much for this- I'm printing this post out to go right in my Burda book- I think this dress would be very cute for Disneyworld!
ReplyDeleteThanks for writing this tutorial!
ReplyDeleteThank you so much! Your dress variation is one of the reasons why I bought the book, I'm so happy now I can try it!
ReplyDeleteoh thanks! this is great, i love your dress! and you make pattern drafting look so easy, it really looks like something i can do too! my sewing machine is at the shop for service this week, looks like a great time to give it a go!
ReplyDeleteyay, i got this book for christmas and love your variation natty jane! it will be so much easier for me to have your tutorial to help! exciting :) :)
ReplyDeleteThis is so good,I was missing the how-to in the book! Your dress was one of my favourites
ReplyDelete